
USER MANUAL
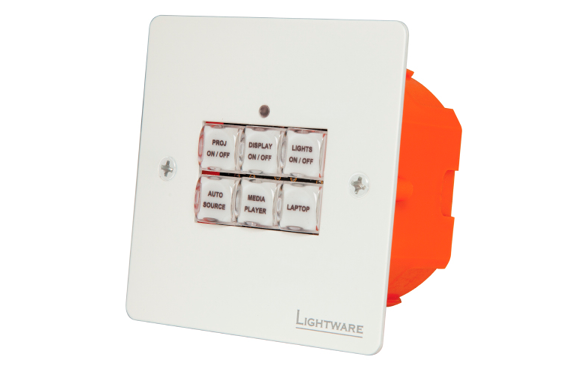
TBP6-EU-W
TBP6-EU-K
Button Panel
|
|
|
|
||
|
|
|
|
||
|
|
|
|
||




|
|
||||

Class II apparatus construction.
The equipment should be operated only from the power source indicated on the product.
To disconnect the equipment safely from power, remove the power cord from the rear of the equipment, or from the power source. The MAINS plug is used as the disconnect device, the disconnect device shall remain readily operable.
There are no user-serviceable parts inside of the unit. Removal of the cover will expose dangerous voltages. To avoid personal injury, do not remove the cover. Do not operate the unit without the cover installed.
The appliance must be safely connected to multimedia systems. Follow instructions described in this manual.
Ventilation
For the correct ventilation and to avoid overheating, ensure enough free space around the appliance. Do not cover the appliance, leave the ventilation holes free and never block or bypass the ventilators (if there are any).
WARNING
To prevent injury, the apparatus is recommended to be securely attached to the floor/wall, or mounted in accordance with the installation instructions. The apparatus shall not be exposed to dripping or splashing, and no objects filled with liquids, such as vases, shall be placed on the apparatus. No naked flame sources, such as lit candles, should be placed on the apparatus.
Waste Electrical & Electronic Equipment (WEEE)
This marking shown on the product or its literature indicates that it should not be disposed with other household wastes at the end of its working life. To prevent possible harm to the environment or human health from uncontrolled waste disposal, please separate this from other types of wastes and recycle it responsibly to promote the sustainable reuse of material resources. Household users should contact either the retailer where they purchased this product or their local government office for details of where and how they can take this item for environmentally safe recycling. Business users should contact their supplier and check the terms and conditions of the purchase contract. This product should not be mixed with other commercial wastes for disposal.
Common Safety Symbols
|
Symbol |
Description |

|
Direct current |

|
Alternating current |
|
Protective conductor terminal |

|
Equipotential Connector |

|
On (Power) |

|
Off (Power) |

|
Double insulation |

|
Caution, possibility of electric shock |

|
Caution |

|
Laser radiation |

|
Warning, Rotating fan |

|
Caution: for indoor use only |
Document Revision History
|
Rev. |
Release date |
Changes |
Editor |
|
v1 |
2026-05-27 |
Initial release. |
Nikolett Keindl |
|
v2 |
2026-09-10 |
ToC correction. |
Laszlo Zsedenyi |
Contact Us
+36 1 255 3800
+36 1 255 3810
Lightware Visual Engineering PLC.
Gizella 51-57, Budapest H-1143, Hungary
©2026 Lightware Visual Engineering. All rights reserved.
All trademarks mentioned are the property of their respective owners.
Specifications are subject to change without notice.
Thank you for choosing Lightware’s Table Button Panel devices. In the first chapter we would like to introduce the device by highlighting the most important features in the sections listed below:
TBP6 button panel was designed to be used with the Event Manager built-in control feature in select Lightware matrix switcher and extender products. The button panel can be installed in meeting rooms to perform basic system control actions like input selection, switching the system on/off, increasing or lowering the volume, etc.
This product has a status LED and a backlight, which are fed from the 7th pin of the GPIO connector. The backlight can be switched off, or its intensity can be set to two levels with the help of traditional jumper switches.
About the Serial Number
Lightware devices contain a label indicating the unique serial number of the product. The structure is the following:
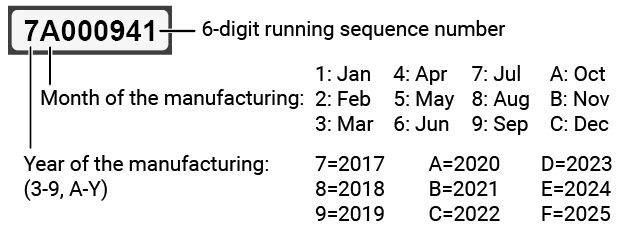
From 1st of October 2024, serial number format of Lightware devices is the following: the first two digits are of the year of manufacture, while the remaining digits make up the running sequence number.

The assembling of certain accessories can be found in the Mounting Options section

|
Event Manager (On the Connected Device) |
|
The Event Manager tool takes care of all the necessary control in a smaller configuration by performing predefined actions in response to device status changes. This feature is available on the connected compatible Lightware device and is used to set the button functions of TBP6 models. |
|

|
Front Panel Buttons |
|
Integrated keypad with 6 programmable backlight buttons. |
|

|
GPIO Control Port |
|
7 configurable GPIO pins that can act as triggers for Events in Event Manager (in the conected Lightware Device) for room control purposes. |
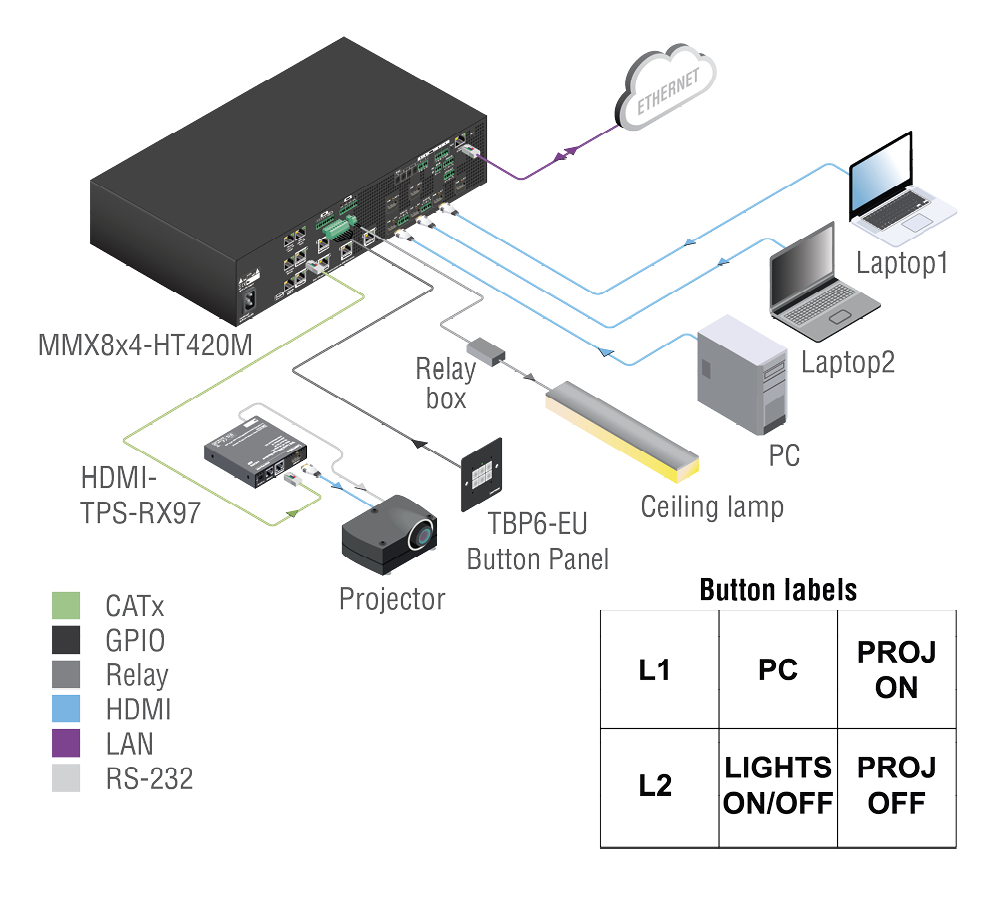
Example Description
The Button panel is connected to the GPIO port of the matrix. The six buttons have the following functions:
|
Button |
Function |
The Realized Action |
|---|---|---|
|
L1 |
Switching Laptop1 to the Projector (RX97). |
Crosspoint change |
|
L2 |
Switching Laptop2 to the Projector (RX97). |
Crosspoint change |
|
PC |
Switching the PC to the Projector (RX97). |
Crosspoint change |
|
LIGHTS ON/OFF |
Toggles the On/Off stat of the Ceiling lamp. |
Toggles the Relay connection |
|
PROJ ON |
Switching the Projector on. |
Message sending over RS-232 |
|
PROJ OFF |
Switching the Projector off |
Message sending over RS-232 |
The direction of the P1-P6 GPIO pins in the matrix are set as Input.Thus, when a button is pressed, the input level on the pin changes to Low. This is used as a Condition that triggers an Action in the Event Manager for the six buttons.
The following sections are about the physical structure of the devices, and their connectors:
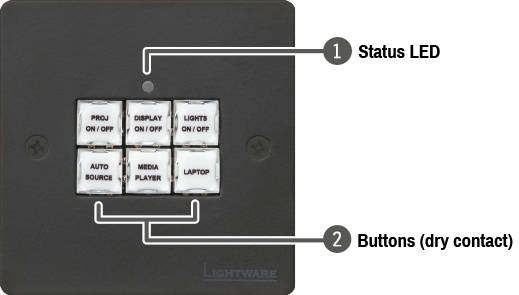
Front View
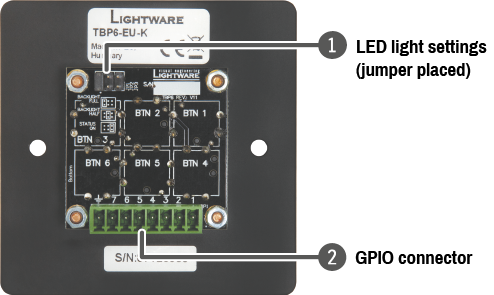
Rear View
INFO:The two models are built exactly the same, the only difference is their color.
Front View
|
|
Status LED |
The Status LED gives a feedback about the jumper position on the rear side. If the jumper is placed on the rightmost pin pair, the status LED is constantly on (in green). |
|
|
Buttons (Dry Contact) |
The buttons can be programmed to a desired function in Event Manager. Labels can be attached as needed. |


Rear View
|
|
LED Light Settings |
The placement of the jumper changes the LED settings. |
||
|
Jumper positions: |

|
The backlight of the buttons is bright (full). |
||

|
The backlight of the buttons is low (half). |
|||

|
The front panel status LED is constantly on. |
|||
|
|
GPIO Connector |
GPIO connector for connection to the device, powering and button functionality setting. See the details in the GPIO connector section. |
||
Pressing the buttons can be used as trigger for Events set in the Event Manager of the connected Lightware device. For more information about setting up an Event, see the Event Manager Application Notes.
3
This chapter is about the installation of the device and connecting to other appliances, presenting also the mounting options and further assembly steps.
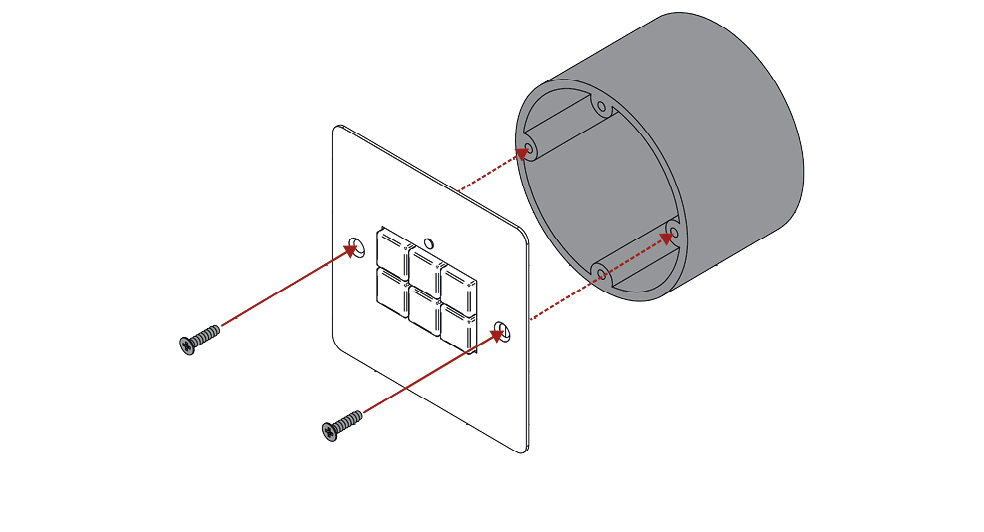
The TBP6-EU button panel can be mounted to a standard European round/circular wall mounting box.
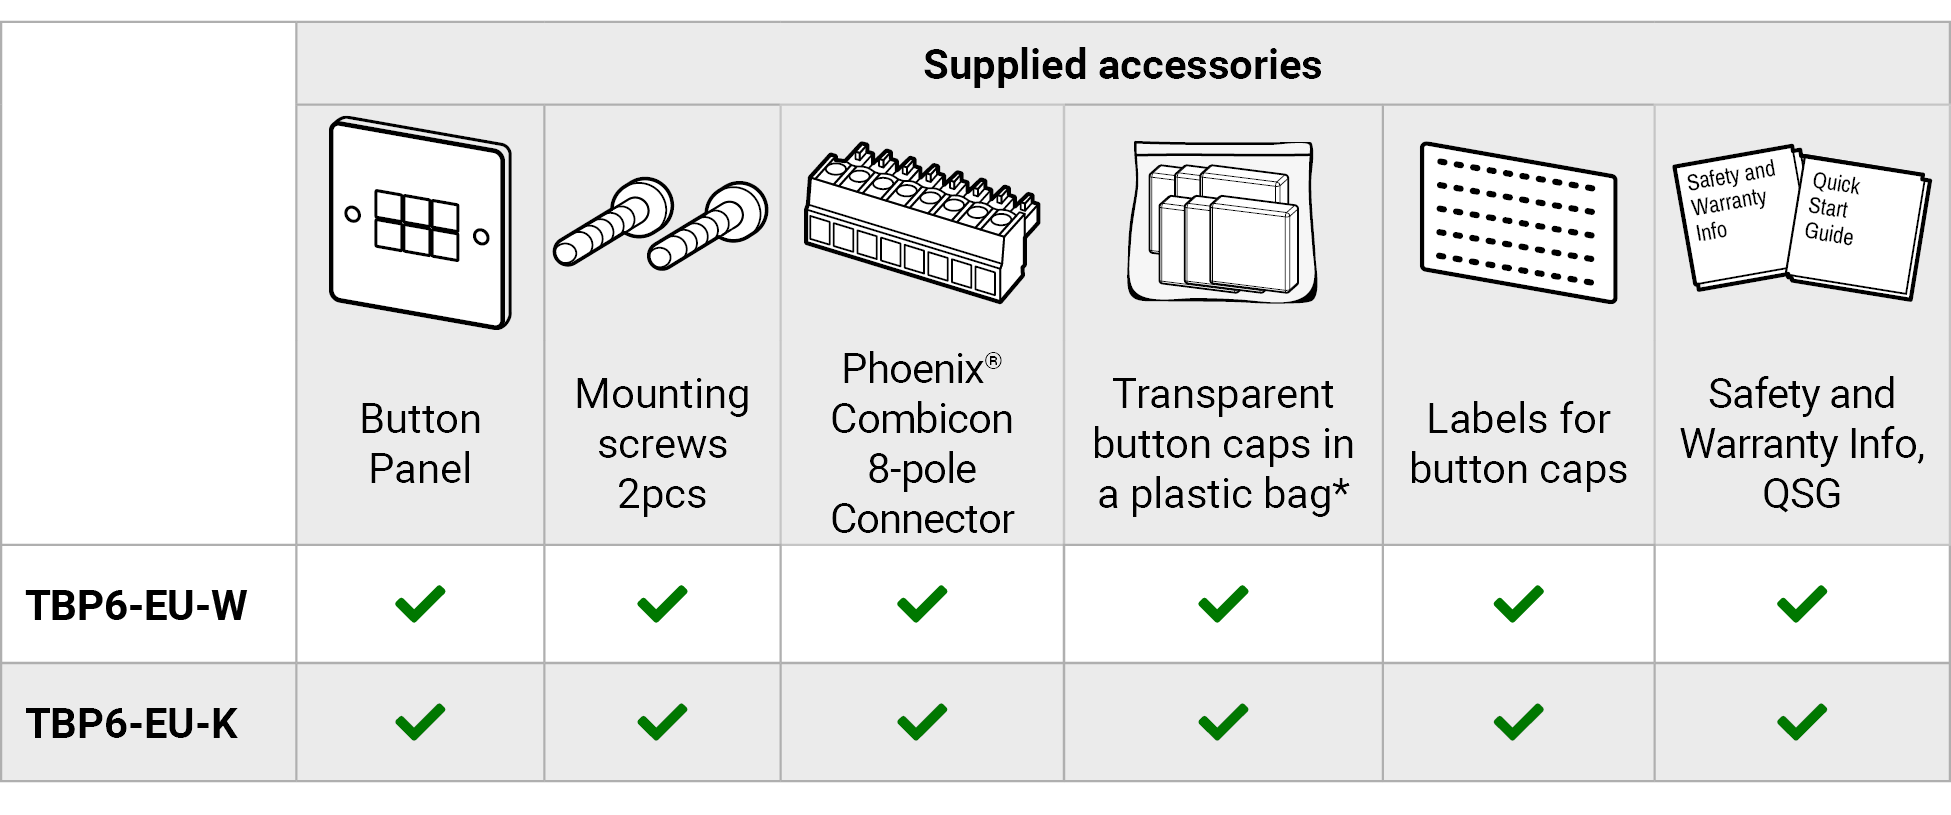
The caps of the buttons are supplied with the product in a separate plastic bag, so that inserting the desired labels and fixing the caps is easy.
Select the desired label and insert it as shown on the next illustration.
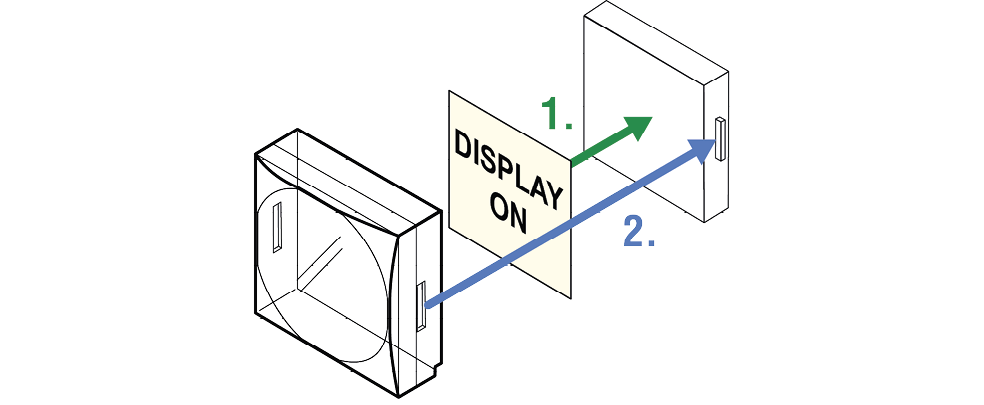
Step 1.Insert the label.
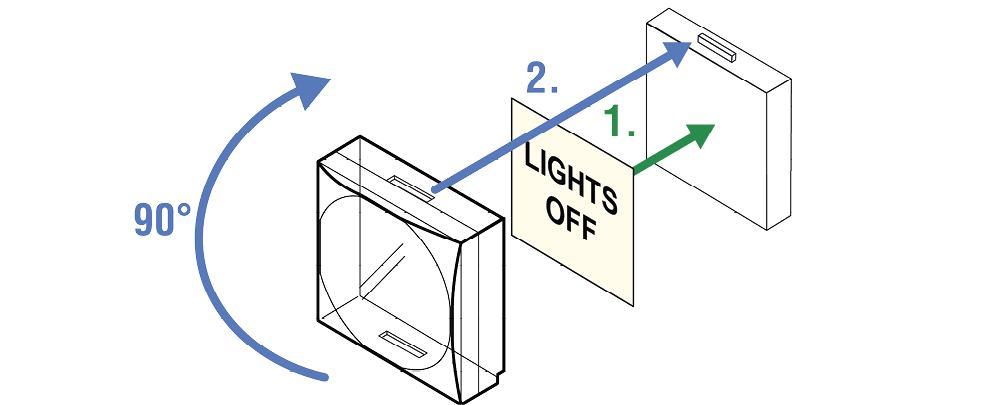
Step 2.Place the cap and pay attention to the nut.
ATTENTION!The directions of the buttons are different, which means certain caps must be rotated by 90°.
The status LED and the backlight function of the buttons can be set by placing a jumper in specific positions.
|
Setting name |
Jumper position |
Function description |
|
JP1 |

|
The backlight of the buttons is bright (full). |
|
JP2 |

|
The backlight of the buttons is low (half). |
|
JP3 |

|
The front panel status LED is constantly on. |
3.3.2. GPIO - General Purpose Input/Output Ports
The switcher transmitter is supplied with an 8-pole Phoenix® connector with six GPIO pins that operate at TTL digital signal levels, and can be set to high or low level (Push-Pull). The direction of the pins can be input or output (adjustable). Voltage ranges for GPIO inputs are the following:
|
Input voltage [V] |
Output voltage [V] |
Max. output current [mA] |
|
|
Logical low level |
0 - 0.8 |
0 - 0.5V |
30 |
|
Logical high level |
2 - 5 |
4.5 - 5V |
18 |
The maximum total current for the six GPIO pins is 180 mA.
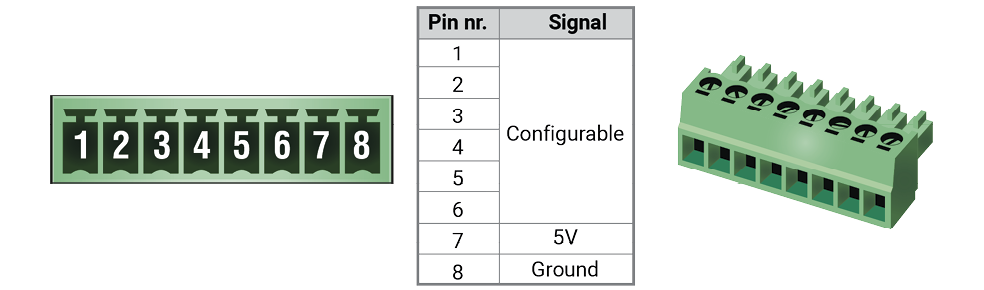
GPIO connector and plug pin assignments
INFO:The recommended cable for the connectors is the AWG24 (0.2 mm2 diameter) or the generally used ‘alarm cable’ with 4x0.22 mm2 wires.
Compatible plug type
Phoenix® Combicon series (3.5mm pitch 8-pole), type: MC 1.5/8-ST-3.5.
Functionality for Pin 7
The 7th pin of the GPIO connection can be used for any of the following functions:
1. Button Backlight Function
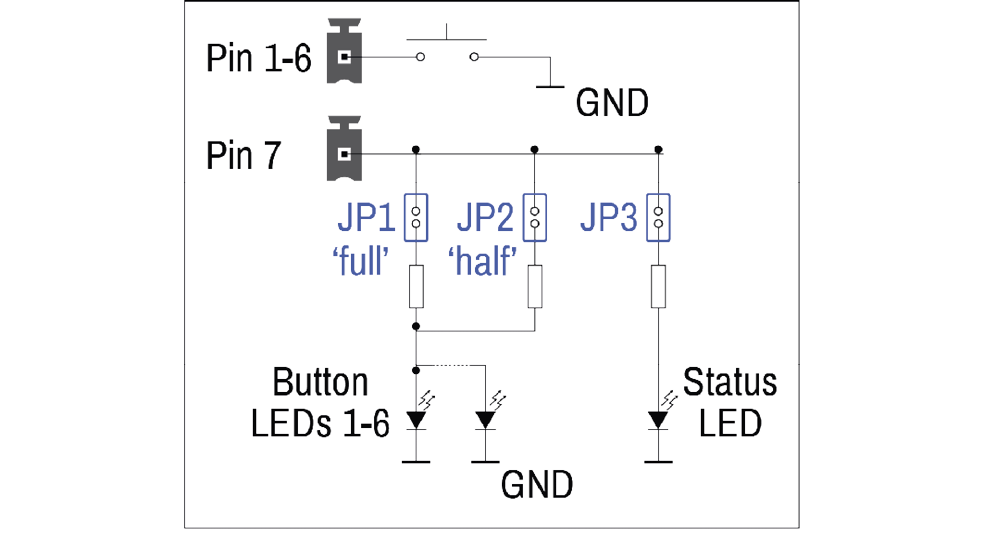
The 7th pin of the button panel is connected to the 7th pin of the GPIO port in the Lightware device. Set the pin direction of the 7th pin to Output and the Output level to High e.g. by using the Lightware Device Controller (LDC) software. The jumper is placed to JP1 or JP2 position. Thus, the backlight buttons are powered over the 7th pin.
2. Remote Status Feedback (Event Manager Action)
The 7th pin of the button panel is connected to the 7th pin of the GPIO port in the Lightware device. The jumper is placed to JP3, the pin direction of the 7th pin is set as Output and the Output level to Low. Thus, the 7th pin of the GPIO port in the Lightwrae device can be used as an Action. E.g. when the projector is switched on, the LED lights (the output level of the 7th pin is changed to High).
DIFFERENCE:This feature is not available in case of MMX8x4-HT420M.
3. Custom Usage of the 7th Pin
In this case the LEDs of the button panel will be dark. The 7th pin of the button panel is not connected. The 7th pin of the GPIO port in the Lightware device will be free and can be used as an input or an output.
INFO:The 7th pin of the GPIO port in the MMX8x4-HT420M matrix sends 5V constantly.
The button panel can be connected to a Lightware device assembled with an 8-pole GPIO port:
▪UMX-TPS-TX130, UMX-TPS-TX140, UMX-TPS-TX140-Plus
▪UMX-HDMI-140, UMX-HDMI-140-Plus
▪DP-TPS-TX220
▪HDMI-TPS-TX220
▪SW4-OPT-TX240RAK
▪DVI-HDCP-TPS-TX220
▪SW4-TPS-TX240, SW4-TPS-TX240-Plus
▪MMX8x4-HT420M, MMX8x8-HT440, MMX8x8-HT080
4
Usually, if the system seems not to transport the signal as expected, the best strategy for troubleshooting is to check signal integrity through the whole signal chain starting from source side and moving forward to receiver end.
Legend

|
Link to the section of connections/cabling. |
|
Symptom |
Root cause |
Action |
Refer to |
|
|---|---|---|---|---|
|
Video issues |
||||
|
No action happens after pressing a button |
The cables between the pins are connected incorrectly. |
Check the Cable Wiring Guide to make sure the correct pins are connected. |

|
|
|
The Event is inactive. |
Check the Event activity status in the Event Manager of the connected device. |
|||
|
The Condition of the Event is set incorrectly. |
Check the Condition settings of the related Event in the Event Manager of the connected device. |
|||
|
The Action of the Event is set incorrectly.. |
Check the Action settings of the related Event in the Event Manager of the connected device. |
|||
4.2. How to Speed Up the Troubleshooting Process
Lightware’s technical support team is always working hard to provide the fastest support possible. Our team’s response time is one of the best in the industry, and in the toughest of cases we can directly consult with the hardware or software engineer who designed the product to get the information from the most reliable source.
However, the troubleshooting process can be even faster… with your help.
There are certain pieces of information that push us in the right direction to find the root cause of the problem. If we receive most of this information in the first e-mail, or it is gathered at the time when you call us, then there is a pretty high chance that we will be able to respond with the final solution right away. This information is the following:
▪Schematic (a pdf version is preferred, but a hand drawing is sufficient).
▪Serial number(s) of the device(s) (it is either printed somewhere on the box or you can query it in the Device Controller software or on the built-in website).
▪Firmware versions of the devices (please note that there may be multiple CPUs or controllers in the device and we need to know all of their firmware versions, a screenshot is the best option).
▪Cable lengths and types (in our experience, it’s usually the cable).
▪Patch panels, gender changers or anything else in the signal path that can affect the transmission.
▪Signal type (resolution, refresh rate, color space, deep color).
▪Emulated EDID(s) (please save them as a file and send it to us).
▪Actions to take in order to re-create the problem (if we cannot reproduce the problem, it is hard for us to find the cause).
▪Photo or video about the problem (‘image noise’ can mean many different things, it’s better if we see it too).
▪Error logs from the Device Controller software.
▪In the case of Event Manager issue, the event file and/or backup file from the Device Controller software.
▪The more of the information above you can give us, the better. Please send this information to the Lightware Support Team (support@lightware.com) to speed up the troubleshooting process.
5
Tables, drawings, guides, and technical details as follows:
INFO:Specifications are subject to change without notice.
General
|
Compliance |
CE, UKCA |
|
EMC (emission) |
EN 55032:2015+A1:2020 |
|
EMC (immunity) |
EN 55035:2017+A11:2020 |
|
RoHS |
EN 63000:2018 |
|
Electrical safety |
EN 62368-1:2020 |
|
Warranty |
3 years |
|
Operating temperature |
0° to +50˚C (+32° to +122˚F) |
|
Operating humidity |
10% to 90%, non-condensing |
|
Cooling |
Passive |
Enclosure
|
Rack mountable |
no |
|
Enclosure material |
1 mm steel |
|
Dimensions (mm) |
80 W x 20 D x 80 H |
|
Dimensions (inch) |
31.5 W x 7.78 D x 31.5 H |
|
Weight |
90 g (0.2 lb) |
Power
|
Power supply |
remote power via the 7th pin of the GPIO |
Control
GPIO
|
Connector type |
8-pole Phoenix connector |
|
Number of configurable pins |
7 |
|
Port direction |
Input or Output |
|
Input voltage: Low / High level |
0-0.8 V / 2-5 V |
|
Output voltage: Low / High level |
0-0.5 V / 4.5-5 V |
Phoenix Connector Wiring
The recommended cable for the connectors is the AWG24 (0.2 mm2 diameter) or the generally used 'alarm cable' with 8x0.22 mm2 wires.
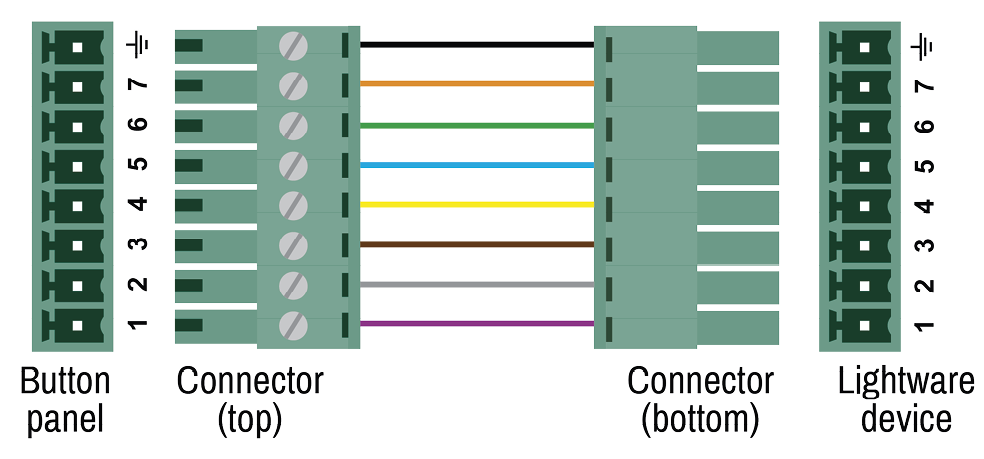
INFO:The connection between the button panel and the GPIO ports was tested by 50 m AWG23 cable type. For longer distance, please contact Lightware.
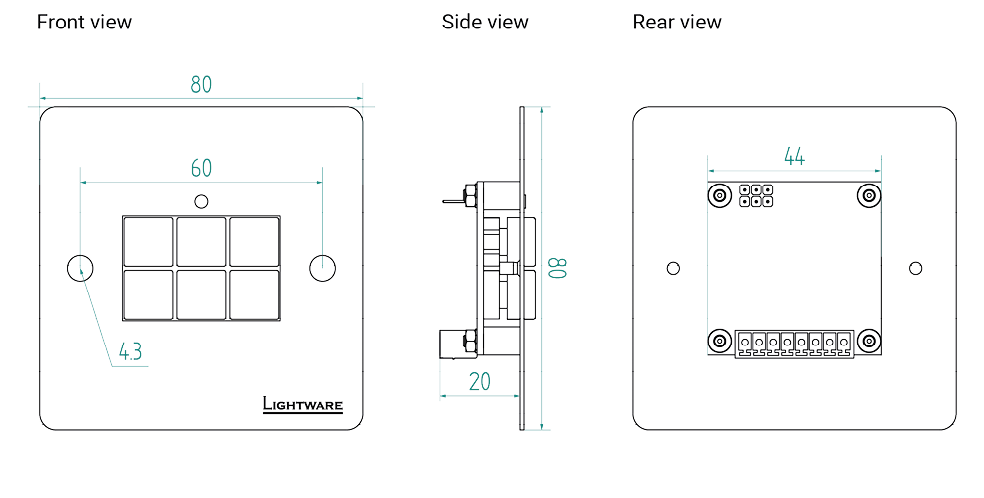
INFO:TBP6-EU-W and TBP6-EU-K have the same dimensions, the only difference is the color.
INFO:Dimensions are in mm.
The Simplified Schematic of the Button Panel
5.4. Further Document Information
Symbol Legend
The following symbols and markings are used in the document:
WARNING!Safety-related information that is highly recommended to read and keep in every case!
ATTENTION!Useful information for performing a successful procedure; it is recommended to read.
DIFFERENCE:Feature or function that is available with a specific firmware/hardware version or product variant.
INFO:A notice, which contains additional information. Procedure can be successful without reading it.
DEFINITION:The short description of a feature or a function.
TIPS AND TRICKS:Ideas that you may have not known yet, but can be useful.
Navigation Buttons
|
Buttons in the PDF version |
Buttons in the HTML version |
|||
|
|
Navigate to the Table of Contents. |
|
Open the main Table of Contents. |
|
|
|
Go back to the previous page. If you clicked on a link previously, you can go back to the source page by pressing the button. |
|
Navigate to the Online User Manuals webpage. |
|
|
|
Navigate to the Bookmark page. |
|
Navigate to the Bookmark page in this User Manual. |
|
|
|
Visit www.lightware.com. |
|
Download the PDF version of the User Manual. |
|


About Printing
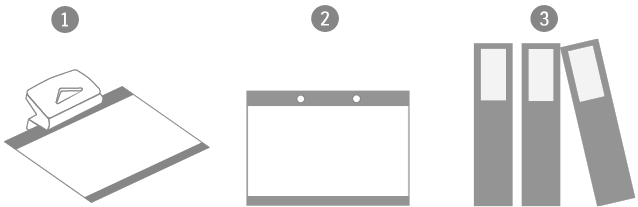
Lightware Visual Engineering supports green technologies and eco-friendly mentality. Thus, this document is made primarily for digital usage. If you need to print out a few pages for any reason, follow the recommended printing settings:
▪Page size: A4
▪Output size: Fit to page or Match page size
▪Orientation: Landscape
TIPS AND TRICKS: Thanks to the size of the original page, a border around the content (gray on the second picture below) makes it possible to organize the pages better. After punching holes in the printed pages, they can easily be placed into a ring folder.
5.5. Limited Warranty Statement
1. Lightware Visual Engineering PLC (Lightware) warrants to all trade and end user customers that any Lightware product purchased will be free from manufacturing defects in both material and workmanship for three (3) years from purchase unless stated otherwise below. The warranty period will begin on the latest possible date where proof of purchase/delivery can be provided by the customer. In the event that no proof can be provided (empty ‘Date of purchase’ field or a copy of invoice), the warranty period will begin from the point of delivery from Lightware.
1.1. 25G and MODEX product series will be subject to a seven (7) year warranty period under the same terms as outlined in this document.
1.2. If during the first three (3) months of purchase, the customer is unhappy with any aspect of a Lightware product, Lightware will accept a return for full credit.
1.3. Any product that fails in the first six (6) months of the warranty period will automatically be eligible for replacement and advanced replacement where available. Any replacements provided will be warranted for the remainder of the original unit’s warranty period.
1.4. Product failures from six (6) months to the end of the warranty period will either be repaired or replaced at the discretion of Lightware. If Lightware chooses to replace the product, then the replacement will be warranted for the remainder of the original unit’s warranty period.
2. The above-stated warranty and procedures will not apply to any product that has been:
2.1. Modified, repaired or altered by anyone other than a certified Lightware engineer unless expressly agreed beforehand.
2.2. Used in any application other than that for which it was intended.
2.3. Subjected to any mechanical or electrical abuse or accidental damage.
2.4. Any costs incurred for repair/replacement of goods that fall into the categories above (2.1., 2.2., 2.3.) will be borne by the customer at a pre-agreed figure.
3. All products to be returned to Lightware require a return material authorization number (RMA) prior to shipment, and this number must be clearly marked on the box. If an RMA number is not obtained or is not clearly marked on the box, Lightware will refuse the shipment.
3.1. The customer will be responsible for in-bound, and Lightware will be responsible for out-bound shipping costs.
3.2. Newly repaired or replaced products will be warranted to the end of the originally purchased product's warranty period.